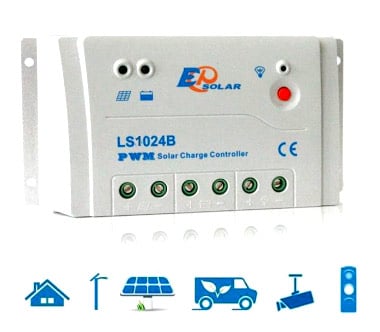
10A PWM ρυθμιστής φόρτισης LS1024

Sale!

10A PWM ρυθμιστής φόρτισης LS1024

19.00 
11.50 ex. VAT
14.26 incl. VAT

10A, προγραμματιζόμενος ρυθμιστής φόρτισης με δυνατότητα νυκτερινής λειτουργίας.

 Τεχνικά στοιχεία -προγραμματισμός

QUICK START INSTRUCTIONS  
This section provides a brief overview of how to get started using the controller. However, please review the entire manual to ensure best performance and years of trouble-free service. 
1. Mount the controller to a vertical surface. Allow space above and below the controller for air flow. 
2. Make sure the PV and load currents will not exceed the ratings of the controller being installed. 
3. It is recommended that the connections be made in order from 1 to 6. (see the following picture)
 
4. Connect the BATTERY first. Use care that bare wires do not touch the metal case of the controller. 
5. Connect the SOLAR(PV array) next. The green LED indicator will light if sunlight is present. 
6. Connect the LIGHT last. If the red LED indicator lights, the battery capacity is low and should be charged before completing the system installation 
7. Press the BUTTON as 6 or 7 to verify the system connecting.
3. Connect the consumer to the charge regulator – plus and minus Please observe that the automatic adjustment to 12V / 24V systems does not function properly, if this sequence order is not followed. An improper sequence order can damage the battery!
LIGHTING CONTROL OPTIONS
1. Press the power switch for 5 seconds, and select the desired LIGHTING CONTROL option. The LED is on, which confirmed you have selected the right one. 
2. The controller requires 10 minutes of continuous transition values before it starts to work. These constraints avoid false transitions due to lightning or dark storm clouds. 
3. 10 minutes off before the controller start to work. 
4. A brief description follows below:
 0,1,2,3,4,5,6,7  For DC output
 0  Dusk-to-Dawn, light is on all light
 1  1 hours light is turn on after sundown
 2  2 hours light is turn on after sundown
 3  3 hours light is turn on after sundown
 4  4 hours light is turn on after sundown
 5  5 hours light is turn on after sundown
 6  6 hours light is turn on after sundown
 7  7 hours light is turn on after sundown
 0。  8 hours light is turn on after sundown
 1。  9 hours light is turn on after sundown
 2。  10 hours light is turn on after sundown
 3。  11 hours light is turn on after sundown
 4。  12 hours light is turn on after sundown
 5。  13 hours light is turn on after sundown
 6。  Lights remain turned off, ON/OFF mode
 7。  Test mode, lights on after it detects no light, lights off after it detects light.


Τιμή χωρίς ΦΠΑ

Description

Ο 10A, προγραμματιζόμενος ρυθμιστής φόρτισης με δυνατότητα νυκτερινής λειτουργίας σε μαύρο ή λευκό χρώμα. Διαθέτει μικροεπεξεργαστή PWM για αποδοτικότερη και ομαλότερη φόρτιση . Προγραμματιζόμενος και για  Νυκτερινή λειτουργία. Διαθέτει  αισθητήρα φωτός και χρονοδιακόπτη. Περιλαμβάνει υποδοχές σύνδεσης συσκευών οι οποίες προγραμματίζονται να λειτουργούν μόλις νυχτώσει ενώ παράλληλα  απενεργοποιούνται σύμφωνα με τον εκάστοτε προγραμματισμό.

 Τεχνικά στοιχεία -προγραμματισμός

QUICK START INSTRUCTIONS  
This section provides a brief overview of how to get started using the controller. However, please review the entire manual to ensure best performance and years of trouble-free service. 
1. Mount the controller to a vertical surface. Allow space above and below the controller for air flow. 
2. Make sure the PV and load currents will not exceed the ratings of the controller being installed. 
3. It is recommended that the connections be made in order from 1 to 6. (see the following picture)
 
4. Connect the BATTERY first. Use care that bare wires do not touch the metal case of the controller. 
5. Connect the SOLAR(PV array) next. The green LED indicator will light if sunlight is present. 
6. Connect the LIGHT last. If the red LED indicator lights, the battery capacity is low and should be charged before completing the system installation 
7. Press the BUTTON as 6 or 7 to verify the system connecting.
3. Connect the consumer to the charge regulator – plus and minus Please observe that the automatic adjustment to 12V / 24V systems does not function properly, if this sequence order is not followed. An improper sequence order can damage the battery!
LIGHTING CONTROL OPTIONS
1. Press the power switch for 5 seconds, and select the desired LIGHTING CONTROL option. The LED is on, which confirmed you have selected the right one. 
2. The controller requires 10 minutes of continuous transition values before it starts to work. These constraints avoid false transitions due to lightning or dark storm clouds. 
3. 10 minutes off before the controller start to work. 
4. A brief description follows below:
 0,1,2,3,4,5,6,7  For DC output
 0  Dusk-to-Dawn, light is on all light
 1  1 hours light is turn on after sundown
 2  2 hours light is turn on after sundown
 3  3 hours light is turn on after sundown
 4  4 hours light is turn on after sundown
 5  5 hours light is turn on after sundown
 6  6 hours light is turn on after sundown
 7  7 hours light is turn on after sundown
 0。  8 hours light is turn on after sundown
 1。  9 hours light is turn on after sundown
 2。  10 hours light is turn on after sundown
 3。  11 hours light is turn on after sundown
 4。  12 hours light is turn on after sundown
 5。  13 hours light is turn on after sundown
 6。  Lights remain turned off, ON/OFF mode
 7。  Test mode, lights on after it detects no light, lights off after it detects light.


Τιμή χωρίς ΦΠΑ

Πληροφορίες PWM Solar Charger 10A, ρυθμιστής φόρτισης,Ρυθμιστής Προγραμματιζόμενος με νυχτερινή λειτουργία- PWM Solar Charger 10A, διαθέτει αισθητήρα φωτός και χρονοδιακόπτη, τιμές

Πληροφορίες PWM Solar Charger 10A, ρυθμιστής φόρτισης

Πληροφορίες Ρυθμιστής Προγραμματιζόμενος με νυχτερινή λειτουργία- PWM Solar Charger 10A, διαθέτει αισθητήρα φωτός και χρονοδιακόπτη, τιμές